Roasted Hazelnut, Dark Chocolate + Raspberry Cake
- Ella

- Dec 17, 2022
- 15 min read
Updated: Jul 22, 2024
Light Hazelnut Cake//Hazelnut Whipped Cream + Mascarpone Filling//Raspberry Jam Filling//Hazelnut + Dark Chocolate Buttercream, cut with a touch of cream cheese

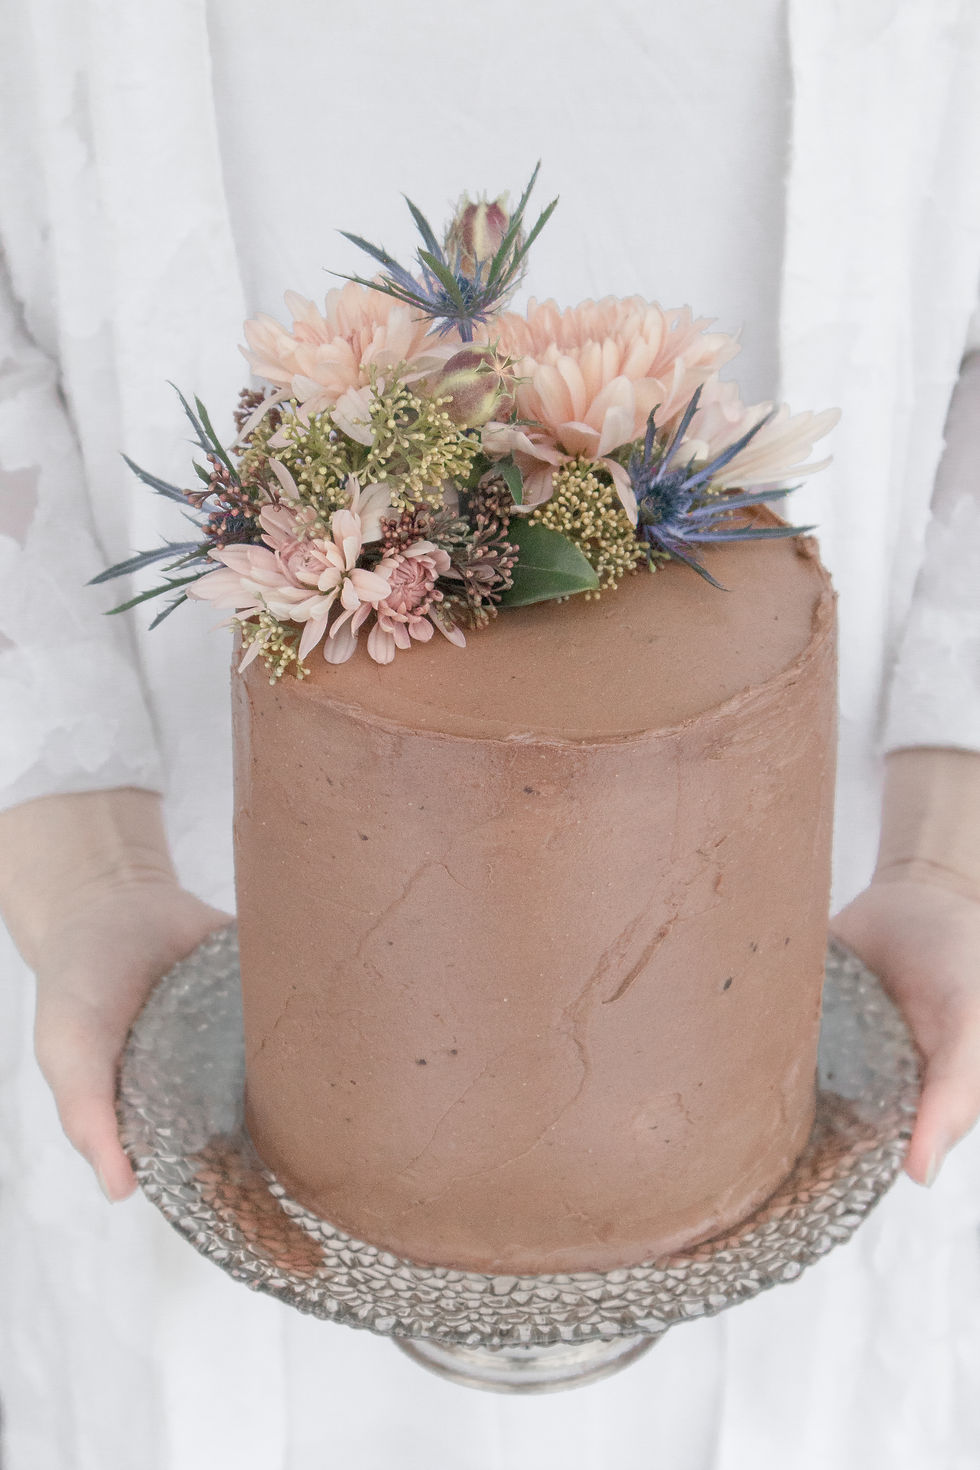


This is a light hazelnut cake, with a roasted hazelnut and dark chocolate buttercream in between its layers, forming two “wells”—and in those “wells” is a whipped mascarpone cream filling flavoured with freshly-made hazelnut butter. Oh, and a thin layer of lovely raspberry jam for some extra fruitiness and tartness. All of this is then covered in more of the roasted hazelnut and dark chocolate buttercream. Pure magic. I also give the option of stopping after adding in the hazelnut butter to the buttercream, and before adding in the chocolate elements, to either choose to omit the chocolate altogether, or, as another option, to fill the centre of the cakes with the pure hazelnut buttercream, before adding in the chocolate, to ice the outside of the cake with. This option essentially gives you two different flavours out of one bowl of buttercream! A cake with 2-3 different “icings”…with different textures, and bursting with flavours…yes please.
This cake is absolutely divine. And it’s so good, really, as it’s a labour of love to make. We start by roasting a big tray of hazelnuts, removing the skins, and then turning a portion of them into hazelnut butter. We then make the cake, along with the different “icings”. I put the word icings in quotations, as the hazelnut component in the middle is more of a whipped filling, as opposed to an icing proper. It’s so light and fluffy, providing the most lovely textural contrast. Because of the process of making the hazelnut butter from scratch, I would say that this is a cake to make when you are really in the mood to bake up something extraordinary, and feel happy to spend a good few hours playing in the kitchen. I would not recommend this to somebody who is in a hurry, or to somebody who does not love baking. I can joyfully recommend my Almond, Lemon & Raspberry Cake with a White Chocolate Drizzle or my Walnut Coffee Cake for those who fall into either of those camps, alternatively. They are all equally delicious.
The cake part is actually just a play off of my Walnut Coffee Cake. It’s the same recipe, but just substitutes hazelnuts for the walnuts. It’s pretty cool as far as cakes go. There’s no baking powder, baking soda, or butter in it. Just eggs! Lots of them. And yet it’s incredibly light and moist. With the fats from the ground nuts and the egg yolks, I suppose this makes sense. The cake itself is flavourful, with the most incredible texture, and is not very sweet. The icings are much sweeter, creating the perfect balance. I love the little pieces of hazelnuts throughout, which offer a textural contrast within the cake.
If you’ve ever been to Eataly, and have tried their hazelnut gelato, or their chocolate hazelnut gelato…you have tasted heaven. Those two flavours, and their pistachio gelato…absolutely insane. I was wondering to myself how these nut-flavoured gelatos were so mind-bogglingly good, and guessed that they freshly roasted and processed the nuts in-house. I wanted to create two icings (well, one icing, and one fluffy filling) modelled after their hazelnut gelato, and their chocolate hazelnut gelato. So I went with my hunch, and took the time to roast the hazelnuts, remove the skins, and process them in my Champion Juicer. Definitely a time-consuming task, but in the end I was jumping up and down in happiness that my hunch had been right, and this was indeed the key to replicating those flavours! Hooray! I’m detailing this to share the inspiration behind this cake, as well as to explain the reason behind the method. I haven’t tried the recipes using store-bought hazelnut butter, but I have of course tasted store-bought hazelnut butter, as well as the one I made, and the homemade version is so much more fragrant and fresh tasting. If you don’t have any equipment to make the hazelnut butter at home, the next best thing would be to source some house-made hazelnut butter from a local health food store. It will taste fresher than a jarred product. If you can’t find that, you can try using an all-natural (jarred) hazelnut butter from the store. I just haven’t tried that, so I don’t know how it will taste. As I go over in the instructions below, the hazelnut butter that I make is processed to the point that it’s runny, and I can pass it through a fine-meshed sieve to remove any little bits of texture. The house-made nut butters that I have seen at health food stores have been quite runny, as compared to their jarred equivalents from the shelves. But if you find a high-quality jarred hazelnut butter which is perfectly smooth, it needn’t be runny (as there is no need to pass it through a sieve).
Note: this cake was made for a friend's birthday. I was certainly not about to cut into her cake to take photos! I will add photos of the inside of the cake next time I make it again. This said, as I mentioned above, the cake itself is the same as my Walnut Coffee Cake, but uses hazelnuts instead of walnuts. So if you'd like to get a good idea of the texture, just click on that link and take a look at those photos.
Recipe:
Makes 1 6-inch cake
Notes
I specify the type of salt used, as different salts are more or less salty than others. If you don’t have the same kind of salt used, be mindful of this and adjust accordingly. Generally speaking, pink Himalayan salt is less salty than most others.
Top tip for room-temperature eggs: if ever you don’t have the time to take them out of the fridge early enough, or yet if you forget, you can place them in a bowl covered with hot water for 5 minutes, and they will become room-temperature just like that!
Make sure that the bowl used for the egg whites, as well as the beaters, are perfectly clean. Even trace amounts of a fat can hinder the whites from whipping into stiff peaks.
Video link to demonstrate how to fold egg whites into cake batter, for those who haven’t done this before: http://www.youtube.com/watch?v=kfgz10xdq6k Skip to the 2 minute 45 second mark.
When you pour the batter into the baking tins, it will look like a lot. Not to worry, your cake layers won’t be this tall once it’s baked and cooled.
Once cooled, the cake layers will be quite a “rustic” shape. This is normal, you haven’t done anything wrong! The icing will fill in any imbalanced lines.
As I indicate in the instructions, don’t level the cake layers off. Not only is it unnecessary—as this cake won’t balloon up in the centre, and we have the icing to balance any lines—but the top of the cake layers has a really special, cool texture which is a little sticky and soft, and it would be sad to remove it.
Step One: Prepping the hazelnuts
We are going to be roasting the hazelnuts, removing the skins, then setting some aside for the cake, and turning the rest into hazelnut butter for the buttercream and whipped cream filling.
Ingredients
550 g hazelnuts
Instructions
Place hazelnuts on a baking tray, and roast them until they are golden and fragrant. You can do this in the oven at 350 degrees Fahrenheit, or in a toaster oven (although this last will take 2 rounds, as it’s a large volume of hazelnuts). The timing will vary based on your oven or toaster oven, as well as on the hazelnuts themselves. This could take anywhere between 5-15 minutes. Watch them carefully, and keep smelling the air—they can burn very quickly. And, conversely, they will be bland if you take them out too soon.
Let the hazelnuts cool down. When they’re cool enough to handle, or completely room-temperature (it doesn’t matter), remove the skins. I like to pour the hazelnuts into a kitchen towel, wrap it up, and alternate between shaking it about and massaging the hazelnuts from the outside. After 30 seconds to a minute of this, unwrap the kitchen towel and pick the hazelnuts out, leaving the skins behind. Don’t worry if some of the skins don’t want to come off of the hazelnuts. As long as a good portion of them are peeled, it’s all good. Discard the hazelnut skins.
Set aside 155 g of the hazelnuts for the cake.
We are now going to make homemade hazelnut butter with the remaining hazelnuts. I own a Champion Juicer. This is what I used to make my hazelnut butter. I used the attachment that doesn’t have holes in it (this one: https://championjuicer.com/product/2000-replacement-part-blank-black/), which pushes out all of the contents (unlike the attachment for juicing, which separates the juice from the pulp). I passed the hazelnuts through the juicer about 10 times, until it was almost entirely smooth and runny (yes, runny). And I learned a trick—the first pass through, I of course use the plunger. Once that first round is through, you have a nut butter. For the rounds following, I simply pour the nut butter back in, and let it pass through naturally, without the plunger. I find using the plunger with the nut butter pushes it through too quickly, and effectively it doesn’t spend enough time around the blades, which makes it require more rounds than if you just let it run through. If it’s not obvious, I use 2 bowls for this operation (one catching and one pouring, alternating each time). I then pass the hazelnut butter through a fine-mesh sieve to remove any remaining texture. Use a spatula to mix and massage it through the sieve. You don’t have to do this if you don’t want to—the Champion Juicer makes it almost entirely smooth, and the little that remains could add a perfectly nice varied texture to the buttercream and whipped cream filling. But if you want it to be perfectly smooth, it needs to be passed through the sieve. You can always add those little bits back in later, if you change your mind, or just want to add texture to the whipped cream filling, but not to the buttercream. Now…if you don’t own a Champion Juicer, or an equivalent piece of machinery which is specially designed to make nut butter (from my understanding, certain Vitamix models are made for this), I would suggest that you used a small food processor. My food processor has an attachment in the form of a smaller container that I can insert into it, and this is what I would have used if I didn’t have a Champion Juicer in my kitchen. Obviously a normal-sized food processor (container) works in the same way, but it might need a larger volume of hazelnuts to process into a butter. So if you also don’t have a small food processor, or a smaller container attachment to put into your food processor, you could just start with more roasted hazelnuts, and that’ll be enough to get it going. Leftovers of this lovely stuff is certainly not a bad thing. Like I mentioned in the instructions above, process the hazelnuts until the butter is runny (remember, I can pass it through a fine-mesh sieve, so it should be that runny!), and very little texture remains. This will likely take several minutes. Feel free to do it in rounds if you feel that your machine is over-heating. Next, pass the hazelnut butter through a sieve (tips and more related details given above).
You can keep your homemade roasted hazelnut butter at room temperature or in the fridge, while you make the rest of the cake.
Hazelnut Cake
Ingredients
45 g all-purpose flour
155 g hazelnuts (roasted, cooled and skinned in step 1 above)
9 eggs, room-temperature
140 g sugar
1 tbsp pure vanilla extract
1/4 + 1/8 tsp salt (pink Himalayan)
Instructions
Preheat oven to 300 degrees Fahrenheit and ensure that oven rack is positioned in the middle.
Butter and flour 3 6-inch baking tins.
Put flour (no need to sift) and 120 g of the hazelnuts in a food processor, and grind until the nuts resemble a nut flour. Using a knife and a cutting board, chop up the remaining hazelnuts (35 g) into roughly thirds. Mix this into the mix in the food processor, using your hands or a utensil.
Separate 9 eggs, putting 9 whites in a large bowl, 8 yolks into another. The extra yolk is not needed for this recipe.
Beat the egg yolks on high speed with an electric mixer for 2 minutes. It should be paler, and little bubbles should appear. And, when you stop beating, froth should appear after 15-30 seconds. Beat for an extra minute or 2 if this doesn’t happen. Add 30 g of sugar, as well as the vanilla. Beat on high for 2 more minutes.
With fresh, clean beaters, beat egg whites and salt on high speed with an electric mixer for 30 seconds, until frothy. Gradually add in remaining sugar (110 g), tablespoon by tablespoon, continuing to beat on high. Beat until stiff, about 4 minutes. This could take several minutes more if your electric mixer isn’t very high-powered, not to worry. If you’re not sure if your whites are stiff enough, know that you should be able to turn the bowl completely upside-down without anything budging.
Add hazelnut-flour mixture to egg yolk mixture. Combine on low speed.
Gently incorporate whites into egg yolk-walnut mixture, a third at a time, using a spatula, until fully combined. For those new to baking—see notes for a link to a video showing how to do this. That is, there’s a specific technique to it to avoid bursting the air bubbles in the whites.
Pour batter evenly into the 3 cake tins. If you feel like being very precise, you can use a kitchen scale.
Place cake tins in the oven, and bake for 22 minutes, or until a toothpick inserted comes out virtually crumbless. The toothpick will, however, be covered with a very thin, wet coating—this is good and normal. If the toothpick comes out with a fair bit of wet batter, or many wet crumbs, let it bake for 2-3 more minutes, and repeat the process until this is no longer the case.
Let the cake cool for 30 minutes, then remove from tins and let them cool completely on cooling racks.
Roasted Hazelnut + Dark Chocolate Buttercream
Ingredients
300 g unsalted butter, room-temperature
200 g powdered sugar
200 g cream cheese, cold
100 g roasted hazelnut butter (start with 80 g if you're not using chocolate)
1/4 tsp salt (pink Himalayan)
150 g dark chocolate
35 g unsweetened cocoa powder
Instructions
A note before you start: Feel free to omit the chocolate and cocoa powder from this recipe. I put the chocolate in as a choice, to mimic the flavour of Nutella (but better!), and to satisfy the chocolate-lovers out there, but the pure hazelnut buttercream is equally delicious. And it certainly compliments the cake equally well. I’m mentioning this to highlight that you don’t need the chocolate if you don’t feel like it. With this cake, I just make the choice between the two options based on my mood, and you can’t go wrong either way! I would start with 80 g of the hazelnut butter if you’re omitting the chocolate, and taste it, before adding in the last 20 g. You may prefer it more subtle, or you may want a stronger flavour, so try it after adding in 80 g. Truthfully, you could even just stop before adding in the chocolate elements, and fill the centre of the cakes with the pure hazelnut buttercream, then add in the chocolate, and use that to ice the outside of the cake, so that you get both. You would just want to decrease the quantity of chocolate and cocoa powder in this case, to keep the proportions the same as intended.
Another note to help you: melted chocolate can be a little finicky, just in the sense that the window of time in which it’s melted and cooled, but before it solidifies is small. So just be mindful of that, and watch it attentively. You’ll want to start making the buttercream before it’s totally cool, as it’ll take just under 10 minutes to whip before it’s ready for the chocolate, which needs to be accounted for. Secondly, I wanted to point out the little dark flecks that you may have noticed in the buttercream in the photos. If you want little pockets of dark chocolate, you can wait a smidge longer in the cooling process, and some of the chocolate will be in a state between liquid and solid. If I had waited 30 seconds longer, I could have had even more flecks of chocolate. This is not an instruction in the recipe—I just wanted to shine a light on that option, if you feel like a bit of texture in your buttercream. Smooth or textured are equally good, I just base my choice on my mood.
Melt the chocolate in a bain marie. [If you don’t know what this means—set a medium sized glass or metal bowl overtop a saucepan of simmering water, with the chocolate in it. Set it over medium-low heat, making sure that it’s fitted, and the water is not touching the bowl. Stir every 30 seconds or so, until the chocolate is fully melted.] Let cool before incorporating into the buttercream.
Place butter in a large bowl, and beat on high speed with an electric mixer for 3 minutes.
Add in powdered sugar, and beat on high for 3 more minutes.
Still beating on high speed, add in cream cheese, tablespoon by tablespoon. Beat for a whole minute after the final addition of cream cheese.
Add in the hazelnut butter and salt, and beat for 1 minute on high.
Taste it! I ordered the final few ingredients strategically, so that you can taste the pure hazelnut buttercream, before adding in the chocolate elements. Just because—YUM! It’s too good. Remember, as I mention earlier, feel free to stop here, and not add in the chocolate elements. I put the chocolate in as a choice, but the pure hazelnut buttercream is equally delicious, and definitely goes equally well with the cake. You don’t need the chocolate if you don’t feel like it.
Add in the cooled melted chocolate, and sift in the cocoa powder. Beat for one last minute on high.
Roasted Hazelnut Whipped Cream + Mascarpone Filling
Note: this recipe will make more that what you will need to fill the cake. You will need to make this quantity, however, as if you do half, you won't have enough substance for the cream to whip properly. I suggest using the leftover whipped cream on crêpes, French toast, waffles, or pancakes! Add berries...maybe a little Nutella...a few chopped up hazelnuts (pralined ones if you want to get crazy)...damn. Yes, yes, yes...and another yes.
Ingredients
230 g full-fat cream, cold
80 g icing sugar
180 g mascarpone, cold
80 g roasted hazelnut butter
1/8 + 1/16 tsp pink salt (a.k.a. 1/8 tsp + half of another)
Instructions
Pour cream and icing sugar into a large bowl. Beat on high until you have a firm whipped cream. Alternative tip: if you own a Vitamix, or another high-powered blender, you can blend the cream and sugar in it instead, on high. I like to do this as it’s faster, and then I don’t get splatters everywhere from the cream. When the cream is whipped, I just transfer it into a mixing bowl, and carry on with the rest of the steps.
Add in the mascarpone. Beat on high for another 3 minutes. The mixture will become more stiff in this time.
Add in the roasted hazelnut butter, and salt. Beat on high for a final 2 minutes. Note: while the filling will of course become a touch stiffer refrigerated, it will remain a little loose. This is what I like and was after. If you want a stiffer filling, feel free to add in a little more mascarpone. Depending on how much you add, you may need to add a little more icing sugar, hazelnut butter, and salt.
Assembly
Additional Ingredients
60 g raspberry jam (I like Bonne Maman)
Instructions
Put a dollop of the roasted hazelnut and dark chocolate buttercream (about a tablespoon) in the centre of the cake stand, and then place the first cake layer on it (don’t level the cake layers off).
Top with a couple of large dollops of buttercream (for those who don’t feel comfortable eyeballing this—I used 100 g). Using an offset spatula or butterknife, disperse icing into an even layer across the cake. It will probably have a scooped top, so really you’re just filling that in and making it level.
Put some buttercream in a piping bag (you don’t need a piping tip, although you’re welcome to use a plain circular one if you’d like). Cut off the tip of the bag, to create an opening of about 1 cm across. Pipe a circle around the outer line of the cake layer, creating a “well”. Then, pipe another circle on top of it to make it taller (we want a fairly deep “well”, so allow for a thick layer of filling in the centre of the cake). Feel free to make that “well” more “perfect” with an offset spatula or butterknife if necessary (if the top circle isn’t directly overtop of the bottom one for example, and needs a little help).
Repeat steps 2 and 3 on a second layer of cake (keep that second layer on a plate for now; we’re not stacking the layers just yet).
Refrigerate the 2 layers of cake that you just piped icing onto for 30 minutes, to allow the buttercream to firm up.
Remove the cake layers from the fridge. Spoon 30 g of raspberry jam into each “well”, and spread it out evenly with the back of a spoon.
Next, fill the “wells” with the roasted hazelnut whipped cream filling. Even out the top with the back of a spoon. The filling should be level with the top of each “well”.
Gently place the second cake layer on top of the first, filling side up. Place the third and final cake layer on top, flat side up.
Spread buttercream around the sides and top of the cake. I like to start with an offset spatula, and then take over with an icing smoother (also called a scraper). It’s your choice as to how you want to ice the outside of your cake. I personally like to fill in the gaps of the sides of the cake in this first step, to make it all even, and just do a thin outer layer. I then refrigerate it for about 30 minutes. After that first layer is hardened, I then do the final “pretty” round of icing the cake. Since the first layer will have hardened, it will be easy to work with, as the layers wont’t be sliding around. If you’re pressed for time, however, or you are doing a more rustic style of icing application that doesn’t require stability (like big swoops), you can just put it all on in one go (not 2 steps). You do you! I just want to explain how I do it, in case you’re new to baking, and could use the tips on how to make the cake easy to work with as you ice it, with a smoother style in mind.
Decorate the top as you wish.
Enjoy at room temperature, or just barely chilled. If it has fully chilled in the fridge, the buttercream will be harder, so take it out of the fridge with enough time for the icing to soften before devouring!
To leave a comment, you will need to Sign Up or Login, as prompted by the pop-up which will appear when you hit Publish.


Comments